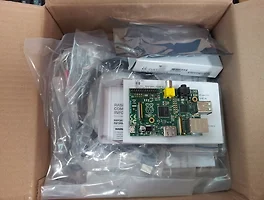
라즈베리 파이를 구매를 한지 3일이 지났는데.. 밤늦게 집에와서야 만지작 거릴수 있어서, 사실 오늘에서야 가동을 해볼 참으로 다시 꺼냈다.
일단 구매했을 당시에 같이 주문했던것이 있다.

어감은 그리 썩 좋지않은.. Raspbian Operating System이라고 적혀있는 SD카드이다. 이미 이미지가 메모리에 들어가있다. 처음 개봉하여 보드에 삽입하고 전원만 넣어주면 부팅이 된다. HDMI출력을 DVI로 바꿔주는 젠더를 동네 컴퓨터가게에서 8500원씩이나 주고샀다. (인터넷에서는 4000원이다. 젠장)


부팅이 완료되면 config 설정 화면이 뜬다. 오호~
앗... 근데!! 마우스는 있는데.. usb키보드가 나에겐 없다.. 블루투스 키보드를 쓰는터라... 그래서 오늘은 요기까지만 확인하는 수밖에..ㅜ_ㅜ
일단 라즈베리파이 wiki에 들어가서 내용을 확인. wiki에 한글이 지원되면 참 좋을듯한데.. 그냥 번역 contribution할 수 있도록 해주면 틈틈히 해줄텐데..
일단 beginner guide(http://elinux.org/RaspberryPiBoardBeginners)를 살펴보자.
Buying guide야 뭐 알아서 국내 리테일러에게 구매해도 되겠고, element14 사이트에서 구매해도 된다.(초반에 입고확인 메일을 받자마자 2set를 구매한건데, 현재 재고는 없음! 알기로는 MODB로 1만대 생산을 했다고 하는데, 1시간만에 다 팔렸다는 소문이...)
그다음으로 Preload your card항목 내용을 정리해보면,
SD카드가 일단 필요하고 부트로더와 OS가 이미 설치되어 있을텐데(preloaded card를 구매했다면, 즉 이미지가 이미 들어가있는 카드), 다시 설치하거나 다른 SD카드를 사용한다면 http://www.raspberrypi.org/downloads 에서 다운로드 받아서 설치할 수 있다. 설치 프로그램을 사용하면 되는데, Fedora ARM installer를 사용해서 이미지를 다운로드하고 설치할 수 있다. 인터넷에 연결된 경우라면 BerryBoot installer를 사용하면 된단다. 그리고, SD카드에 이미지를 복사하는 방법에 대해서 설명을 하고 있는데,
<윈도우에서 SD카드에 이미지를 복사하는 방법>
- image파일을 다운로드 하시오. 원하는 버젼으로...
Download the image from a mirror or torrent. The remainder of this assumes you are using the Raspbian “wheezy” download 2012-10-28-wheezy-raspbian.zip - 다운로드는 여기 -----> http://www.raspberrypi.org/downloads
- 다운로드 받은 zip파일을 압축을 해제하고...
Extract the image file 2012-10-28-wheezy-raspbian.img from the downloaded .zip file. - SD카드 리더기에 SD카드를 삽입하고, 만약에 새 카드가 아니면 포맷을 하시오.
Insert the SD card into your SD card reader and check what drive letter it was assigned. You can easily see the drive letter (for example G:) by looking in the left column of Windows Explorer. If the card is not new, you should format it; otherwise Win32DiskImager may hang. - Win32DiskImager 유틸리티를 다운로드 받으시오. (https://launchpad.net/win32-image-writer)
Download the Win32DiskImager utility. The download links are on the right hand side of the page, you want the binary zip. - 압축을 풀고, Win32DiskImager를 관리자권한으로 실행시키시오.
Extract the executable from the zip file and run the Win32DiskImager utility. You should run the utility as Administrator! - image파일(*.img)을 선택.
Select the 2012-10-28-wheezy-raspbian.img image file you extracted earlier - SD카드 reader기의 드라이브(D:? E:? F:? 등)를 선택.
Select the drive letter of the SD card in the device box. Be careful to select the correct drive; if you get the wrong one you can destroy your computer's hard disk! - Write를 클릭
Click Write and wait for the write to complete. - 완료되면 프로그램을 종료하고 SD카드를 뽑는다.
Exit the imager and eject the SD card. - SD카드를 보드에 삽입하고, 전원을 넣으면 끝.
Insert the card in the Raspberry Pi, power it on, and it should boot up. There is an option in the configure script that comes up to expand the partitions to use all of the SD card if you have used one larger than 4 GB
다른 OS를 사용하거나 문제해결을 위해서는 해당 페이지를 참조.(http://elinux.org/RPi_Easy_SD_Card_Setup)
'Robotics > Hardware Tech.' 카테고리의 다른 글
| 중국산 Jlink 사용기 (2) | 2014.09.25 |
|---|---|
| 저가의 소형 임베디드 시스템 (0) | 2013.01.17 |
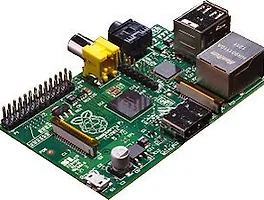
| 라즈베리파이(Raspberry Pi) 512M 구매 (0) | 2012.11.26 |
| Analog Device사의 ADIS16365와 ADISUSBZ 가지고 놀기 (6) | 2010.01.17 |
| IMU(Inertia measurement Unit) (0) | 2009.06.14 |