Introduction
In this project I made an application program for Text-to-Speech Conversion. To build this application, we must install the SDK speech from Microsoft on our computer. You can download Speech SDK (it's free) from http://www.microsoft.comm/speech
The SAPI API provides a high-level interface between an application and speech engines. SAPI implements all the low-level details needed to control and manage the real-time operations of various speech engines.
Applications can control text-to-speech (TTS) using the ISpVoice Component Object Model (COM) interface. Once an application has created an ISpVoice object, the application only needs to call ISpVoice::Speak to generate speech output from some text data. In addition, the IspVoice interface also provides several methods for changing voice and synthesis properties such as speaking rate ISpVoice::SetRate, output volume ISpVoice::SetVolume and changing the current speaking voice ISpVoice::SetVoice.
The project devided into five steps :
- Creating New Project
- Setting Project
- Building GUI
- Coding
1. Creating New Project
First you will create the initial ATL project using the MFC AppWizard.
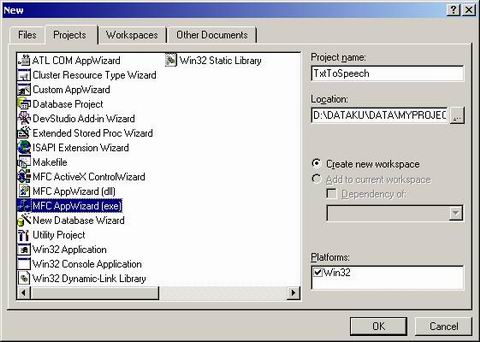
- In the Visual C++ environment, click New on the File menu, then choose the Projects tab.
- Select the MFC AppWizard (exe).
- Type TxtToSpeech as the project name.
Your dialog box should look like this:

Figure 1: New Project
Click OK and the MFC AppWizard presents a dialog box offering several choices to configure the type of MFC project (figure 2), choose Dialog based. After that, click Finish button

Figure 2: MFC AppWizard Step 1, choose Dialog based
2. Setting Project
To use SAPI (Speech Application Interface) in our application, we must set our project. In file StdAfx.h, Add code like this (after "#include <stdio.h>" but before the "#endif" statement) :
  #include <atlbase.h>
  extern CComModule _Module;
  #include <atlcom.h>
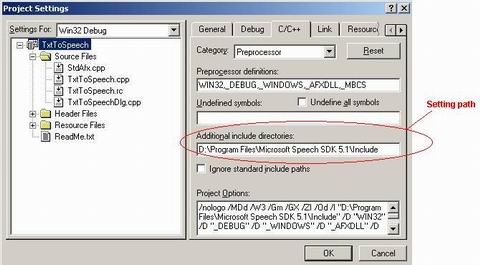
Change the project settings to reflect the paths. Using the Project->Settings. menu item, set the SAPI.h path. Click the C/C++ tab and select Preprocessor from the Category drop-down list. Enter the following in the "Additional include directories": with directory that Speech SDK available , such as D:\Program Files\Microsoft Speech SDK 5.1\Include. (see figure 3)

Figure 3: Setting path
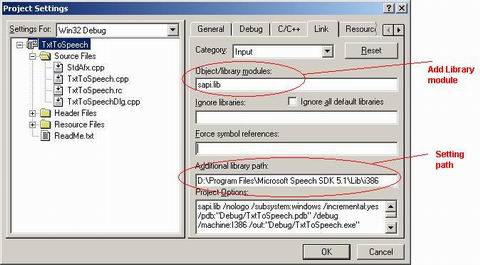
To set the SAPI.lib path (see figure 4):
- Select the Link tab from the Same Settings dialog box.
- Choose Input from the Category drop-down list.
- Add the following path to the "Additional library path" (directory that Speech SDK available), example :
D:\Program Files\Microsoft Speech SDK 5.1\Lib\i386. - Also add "sapi.lib" to the "Object/library modules" line.

Figure 4: Add library module Sapi.lib and set path
3. Building GUI
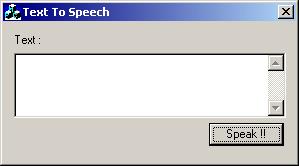
Model of GUI in this project like figure 5 :

Figure 5: GUI project
4. Coding
In GUI, double click Button, type OnSpeak as name of method. This code:
    UpdateData();
    ISpVoice * pVoice = NULL;

    if (FAILED(CoInitialize(NULL)))
    {
        AfxMessageBox("Error to intiliaze COM");
        return;
    }

    HRESULT hr = CoCreateInstance(CLSID_SpVoice, NULL,
        CLSCTX_ALL, IID_ISpVoice, (void **)&pVoice);
    if( SUCCEEDED( hr ) )
    {
        hr = pVoice->Speak(m_sText.AllocSysString(), 0, NULL);
        pVoice->Release();
        pVoice = NULL;
    }

    CoUninitialize();
Note: m_sText is variable of Edit Box
After that, you can compile and run this project.
Reference
Speech SDK 5.1
'Robotics > Software Tech.' 카테고리의 다른 글
| [mfc]마이크 입력 레벨메터 소스 (0) | 2007.12.16 |
|---|---|
| TTS(Text To Speech) (2) | 2007.12.16 |
| MFC Tip (0) | 2007.11.21 |
| 네트워크 영상/음성 전송 프로그램 (0) | 2007.11.20 |
| LAN을 위한 소켓 프로그래밍 #2 (0) | 2007.11.17 |
